Learning VIM
2024-12-05
Table of Contents
- Installing VIM
- Understanding vim Modes
- 1. Normal Mode
- Features in Normal Mode:
- Exiting Normal Mode:
- 2. Insert Mode
- i vs. I
- Example:
- a vs. A
- Example:
- o vs. O
- Example:
- Why Capitalization Matters
- Features in Insert Mode:
- Exiting Insert Mode:
- 3. Visual Mode
- Features in Visual Mode:
- Exiting Visual Mode:
- 4. Command-Line Mode
- Examples of Commands:
- Exiting Command-Line Mode:
- Combining Multiple Commands
- Commands Cheat Sheet
- Using Command Combinations
- Examples of Command Combinations:
- Combining Commands with Count Prefixes:
- The :set Command
- 1. Enable Line Numbers
- 2. Highlight Search Results
- 3. Auto-Indentation
- 4. Tab and Space Settings
- 5. Line Wrapping
- 6. Search Case Sensitivity
- 7. Auto-Completion
- 8. Backup and Swap Files
- 9. Status Line Customization
- 10. Show Line and Column Number
- 11. Mouse Support
- 12. Vim Colorscheme
- 13. Line Break Characters
- .vimrc File
- Basic Structure
- Explanation of Comments:
- Waypoints in Vim
- Setting and Using Marks:
- Example:
- The :reg Command
- Viewing Registers
- Using Specific Registers
- Types of Registers:
- Examples:
Everything is based on this video.
Installing VIM
First, check if it’s installed by typing vi or vim in the terminal. If you see the following output:
it means the program is installed. Otherwise, you’ll need to install it using your Linux package manager.
If you're on Ubuntu, use the following commands:
sudo apt install vi or
sudo apt install vim Understanding vim Modes
Vim has several modes, each designed for specific tasks. Vim’s modes are its core strength, allowing efficient text manipulation and navigation. Each mode has a specific purpose, and transitioning between them is seamless.
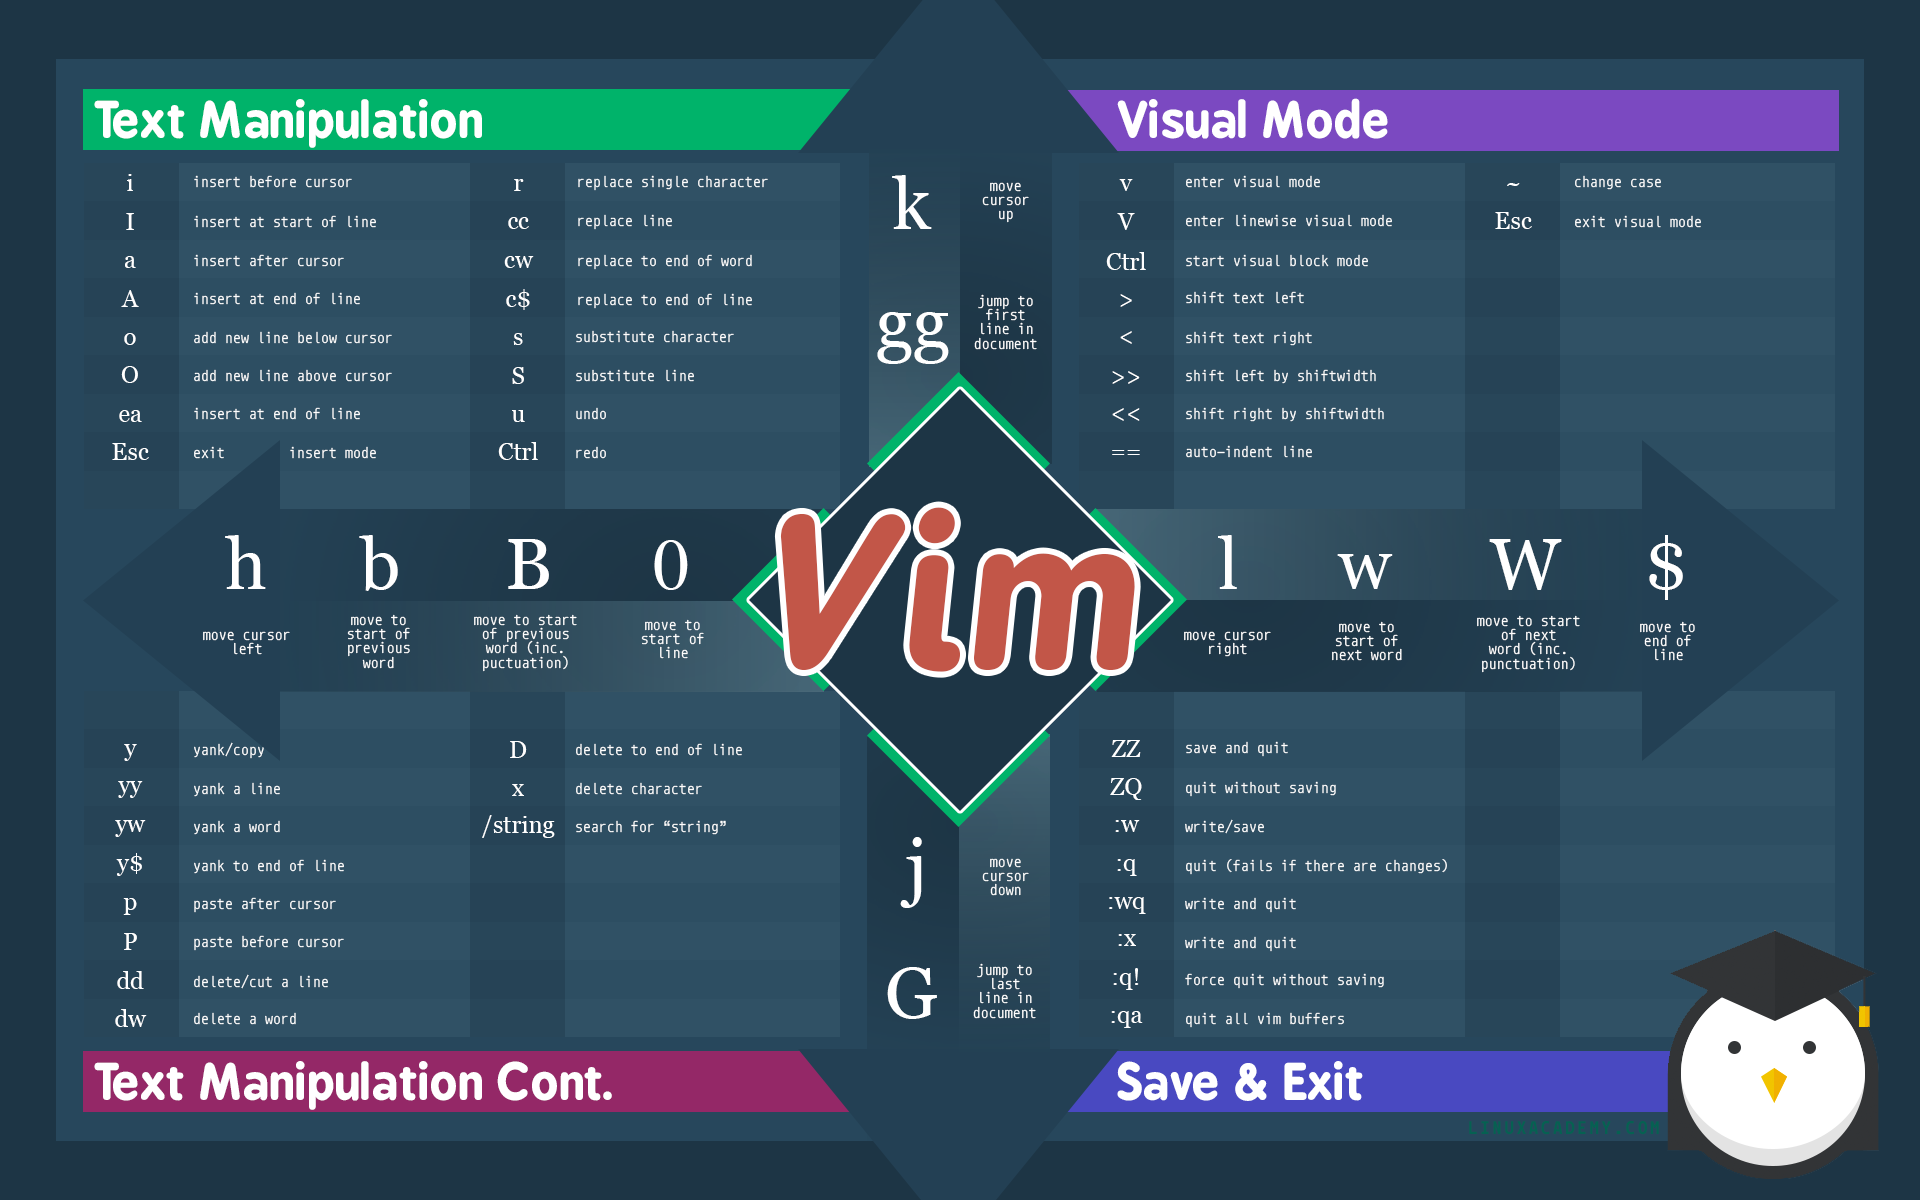
1. Normal Mode
Purpose: The default mode for navigating and executing commands.
How to Enter: Press Esc from any mode.
Features in Normal Mode:
- Cursor Navigation:
- Use
h(left),j(down),k(up), andl(right). - Jump words with
w(next word) orb(back a word). - Jump to start/end of the line with
^/$.
- Use
- Editing Commands:
dd: Delete a line.yy: Copy (yank) a line.p: Paste copied/cut text.u: Undo the last change.
- Search & Replace:
/the-thing-you-want: Search forward for "the-thing-you-want".?the-thing-you-want: Search backward for "the-thing-you-want".
Exiting Normal Mode:
You're always in Normal Mode unless you've entered another mode. Press Esc to ensure you're back.
2. Insert Mode
Purpose: To insert text into the file.
In Vim, capitalized versions of commands often extend or modify the behavior of their lowercase counterparts, typically operating on a larger scope or providing a slightly different action. Here’s how capitalized versions of i, a, and o behave and differ from their lowercase equivalents:
i vs. I
i(Insert Mode):- Enters Insert Mode at the current cursor position.
- You can begin inserting text immediately before the character where the cursor is located.
I(Insert at Start of Line):- Enters Insert Mode at the beginning of the current line, skipping over any leading whitespace or indentation.
- This is useful for quickly editing or appending text at the start of a line without manually navigating there.
Example:
   This is a sentence.  (Cursor on the "T")

Pressing `i`:  Insert before "T".
Pressing `I`:  Insert at the very start of the line (before the "T" and leading spaces).
a vs. A
a(Append Mode):- Enters Insert Mode immediately after the current cursor position.
- Allows you to append text to the current character.
A(Append at End of Line):- Enters Insert Mode at the end of the current line, regardless of the cursor’s current position.
- Ideal for quickly adding text at the end of a line.
Example:
   This is a sentence.  (Cursor on "T")

Pressing `a`:  Append after "T".
Pressing `A`:  Jump to the end of the line and begin inserting.
o vs. O
o(Open Below):- Opens a new line below the current line and enters Insert Mode.
- Convenient for adding new lines after the current one.
O(Open Above):- Opens a new line above the current line and enters Insert Mode.
- Useful for quickly inserting new lines before the current line.
Example:
   Line 1
   Line 2 (Cursor here)
   Line 3

Pressing `o`:  Opens a new line below "Line 2".
Pressing `O`:  Opens a new line above "Line 2".
Why Capitalization Matters
Capitalized commands like I, A, and O are shortcuts for actions that would otherwise require additional steps or motions:
Isaves time by avoiding manual navigation to the start of the line.Aavoids navigating to the end of the line before appending.- **
Oandomake it easy to insert blank lines without leaving the current context.
This behavior reflects Vim's philosophy of providing shortcuts for repetitive or common editing tasks while maintaining efficient text editing workflows. By mastering these commands, you can significantly improve your productivity in Vim.
Features in Insert Mode:
- Type as you would in a regular text editor.
- Use arrow keys to navigate (though it's better to return to Normal Mode for navigation).
Exiting Insert Mode:
Press Esc to return to Normal Mode.
3. Visual Mode
Purpose: To select text for manipulation.
How to Enter:
v: Character-wise selection.V: Line-wise selection.Ctrl+v: Block/column-wise selection.
Features in Visual Mode:
- Highlight text with cursor movement.
- Perform actions like:
d: Cut (delete) selection.y: Copy (yank) selection.>/<: Indent or unindent selection. It's like pressingTABU/u: Convert selection to uppercase/lowercase.
Exiting Visual Mode:
Press Esc to return to Normal Mode.
4. Command-Line Mode
Purpose: Execute advanced commands like saving, quitting, or search-and-replace.
How to Enter:
:: For general commands./: For forward search.?: For backward search.
Examples of Commands:
:w: Save changes.:q: Quit.:wq: Save and quit.:q!: Quit without saving.:s/old/new/g: Replace "old" with "new" in the current line.
Exiting Command-Line Mode:
Press Esc to cancel the current command or after executing it.
These modes make Vim incredibly versatile, catering to diverse editing needs and workflows. By mastering them, you unlock Vim's full potential for efficient text editing.
Combining Multiple Commands
In Vim, you can combine multiple commands to perform actions in sequence on text or the file you're editing. This allows for powerful, efficient editing without needing to switch modes repeatedly.
Commands Cheat Sheet
Using Command Combinations
You can combine commands by using command prefixes, which allow you to perform multiple actions in a single command.
Examples of Command Combinations:
Delete Word (
diw):The command
diwcombines two commands:d: Deleteiw: Inner word (selects the word under the cursor).
This deletes the word under the cursor without deleting the space after it.
plaintextThe quick brown foxIf the cursor is on "quick", pressing
diwwill delete "quick", leaving "The brown fox".
Change Word (
ciw):ciwstands for "change inner word".c: Change (deletes and enters insert mode)iw: Inner word (selects the word under the cursor).
This command deletes the word and enters Insert Mode for you to type a new word.
plaintextThe quick brown foxIf the cursor is on "quick", pressing
ciwwill delete "quick" and place the cursor in Insert Mode to type a new word.
Delete Inside Brackets (
di():di(combinesd(delete) andi((inner parentheses).It deletes the contents inside parentheses, but leaves the parentheses themselves intact.
plaintextThis is (sample text) inside parentheses.If the cursor is inside the parentheses, pressing
di(will delete "sample text" but leave the parentheses.
Yank Line (
yy):yyyanks (copies) the entire line the cursor is on, including line breaks.- You can also use
2yyto yank multiple lines at once (in this case, 2 lines).
Indent Selection (
>or<):- To indent a selection, you can use the
>command.- In Visual Mode (
vorV), you can select a block of text and then use>to indent the entire block.
- In Visual Mode (
- To un-indent, use
<.
- To indent a selection, you can use the
Undo and Redo:
u: Undo the last change.Ctrl+r: Redo the undone change.
Combining Commands with Count Prefixes:
You can also prefix commands with numbers to apply them a certain number of times.
- Example:
5dd:- Deletes 5 lines starting from the cursor's current position.
- Example:
3w:- Moves the cursor forward 3 words.
This technique of combining commands and using prefixes significantly enhances Vim's efficiency, making it easier to manipulate text with fewer keystrokes.
The :set Command
Here are examples of the :set command in Vim, showcasing how to customize the editor's behavior and appearance:
1. Enable Line Numbers
Absolute Line Numbers:
vim:set numberDisplays line numbers on the left-hand side of the screen.
Relative Line Numbers:
vim:set relativenumberShows line numbers relative to the current cursor position, making it easier to navigate using commands like
5jor10k.Disable Line Numbers:
vim:set nonumber :set norelativenumberDisables both absolute and relative line numbers.
2. Highlight Search Results
Enable Search Highlighting:
vim:set hlsearchHighlights all search matches in the document.
Disable Search Highlighting:
vim:set nohlsearchTurns off the search highlighting after completing a search.
Enable Incremental Search:
vim:set incsearchShows search results as you type, instead of waiting until you press
Enter.Disable Incremental Search:
vim:set noincsearch
3. Auto-Indentation
Enable Auto-Indentation:
vim:set smartindentAutomatically indents new lines based on the previous line's indentation (useful for programming).
Enable Syntax-based Indentation:
vim:set filetype=python :set smarttab :set autoindent :set tabstop=4 :set shiftwidth=4Customizes indentation rules for a specific file type, such as Python. These settings ensure consistent indentation using 4 spaces.
Disable Auto-Indentation:
vim:set noautoindent :set nosmartindent
4. Tab and Space Settings
Set Tab Width:
vim:set tabstop=4Sets the width of a tab character to 4 spaces.
Set Indentation Width:
vim:set shiftwidth=4Sets the number of spaces to use for indentation when pressing
>or<.Use Spaces Instead of Tabs:
vim:set expandtabConverts tab characters to spaces (commonly used in Python and other languages).
Use Tabs Instead of Spaces:
vim:set noexpandtabEnsures that tabs are inserted when the Tab key is pressed, rather than spaces.
5. Line Wrapping
Enable Line Wrapping:
vim:set wrapEnables text wrapping, so lines that extend past the screen width are wrapped onto the next line.
Disable Line Wrapping:
vim:set nowrapDisables text wrapping, and long lines will scroll horizontally instead of wrapping.
6. Search Case Sensitivity
Case-Insensitive Search:
vim:set ignorecaseMakes searches case-insensitive (e.g., searching for "apple" will match "Apple", "APPLE", etc.).
Case-Sensitive Search:
vim:set noignorecaseEnsures searches are case-sensitive.
Smart Case Search:
vim:set smartcaseMakes searches case-insensitive unless you use an uppercase letter in the search query. For example, searching for "apple" will match all cases, but searching for "Apple" will only match "Apple".
7. Auto-Completion
Enable File Completion:
vim:set wildmenuEnhances the command-line completion feature with a graphical menu-like interface.
Enable Path Completion:
vim:set wildmode=list:longestEnables more intuitive file path completion on the command line.
8. Backup and Swap Files
Disable Swap Files:
vim:set noswapfileDisables the creation of swap files. Swap files are used for recovering unsaved changes in case of a crash.
Enable Backup Files:
vim:set backup :set backupdir=~/vim-backupsEnables creating backup files when saving a file and specifies the directory for backups.
Disable Backup Files:
vim:set nobackup
9. Status Line Customization
Enable the Status Line:
vim:set laststatus=2Always shows the status line at the bottom of the Vim window.
Disable the Status Line:
vim:set laststatus=0
10. Show Line and Column Number
- Enable Line and Column Number Display:
Displays the current line and column number in the status line, so you always know your position in the file.vim
:set ruler
11. Mouse Support
Enable Mouse Support:
vim:set mouse=aEnables mouse support for selecting text and resizing windows inside Vim.
Disable Mouse Support:
vim:set mouse=
12. Vim Colorscheme
- Set a Colorscheme:
Sets the colorscheme to "desert" (you can replacevim
:colorscheme desertdesertwith any other installed colorscheme likeelflord,morning, orindustry).
13. Line Break Characters
Display Non-printing Characters:
vim:set list :set listchars=tab:»·,trail:·This shows special characters like tabs (
») and trailing spaces (·), which can be useful for cleaning up your text.Hide Non-printing Characters:
vim:set nolist
These :set commands let you tweak Vim to match your workflow and preferences, from simple appearance changes to more advanced features like auto-indentation or search behaviors. Once you’ve customized your settings, you can even save them in your .vimrc file to make these changes permanent across sessions.
.vimrc File
The .vimrc file is a configuration file that Vim loads at startup, allowing you to customize Vim’s behavior.
Location of the .vimrc file: ~/.vimrc
Basic Structure
The .vimrc file contains Vim commands for settings, keybindings, and other customizations.
" Enable line numbers
set number

" Enable syntax highlighting
syntax enable

" Set color scheme to 'desert'
colorscheme desert

" Enable smart indentation, set tab width and spaces for indentation
set smartindent          " Automatically indent new lines
set shiftwidth=4         " Indentation width for new lines
set tabstop=4            " Number of spaces a tab is equal to
set expandtab            " Convert tabs to spaces

" Ignore case during search and highlight search results
set ignorecase           " Ignore case in searches
set hlsearch             " Highlight search matches

" Enable mouse support in all modes
set mouse=a              " Mouse can be used in all modes (Normal, Insert, Visual, etc.)

" Enable backup files and specify backup directory
set backup               " Enable backup files
set backupdir=~/vim-backups  " Set the directory for backup files

" Automatically set the filetype to Python for .py files
autocmd BufRead,BufNewFile *.py set filetype=python

" Map 'jj' to escape Insert mode (useful for avoiding the Esc key)
inoremap jj <Esc>        " Press 'jj' to exit Insert mode
Explanation of Comments:
- Line Numbers: Displays line numbers for easier navigation.
- Syntax Highlighting: Enables syntax color coding for better readability.
- Color Scheme: Sets a predefined color scheme for the editor.
- Indentation: Configures tab and space behavior to match the desired coding style.
- Search Settings: Makes searches case-insensitive and highlights matching results.
- Mouse Support: Allows using the mouse in all Vim modes.
- Backup Files: Enables backups and sets the directory where backup files will be stored.
- Filetype Settings: Automatically applies file-specific settings based on file extension (e.g., Python for
.pyfiles). - Key Mapping: Allows custom key mappings, such as pressing
jjto exit Insert mode.
Waypoints in Vim
Waypoints are useful for marking specific places in your file to quickly return to. This can be especially helpful when navigating through large files. In Vim, waypoints are often referred to as marks.
Setting and Using Marks:
- Set a Mark:
- To set a mark, press
mfollowed by a letter (a-z). For example,masets a mark namedaat the current cursor position.
- To set a mark, press
- Jump to a Mark:
- To jump to a specific mark, press
'followed by the mark's letter. For example,'atakes you to the position where markawas set.
- To jump to a specific mark, press
- View All Marks:
- You can see a list of all active marks by typing
:marks.
- You can see a list of all active marks by typing
Example:
- Move to a specific line, say line 10.
- Set a mark with
ma(mark "a"). - Continue editing elsewhere.
- Return to the mark by typing
'a.
Marks allow you to quickly navigate between important points in your file without needing to rely on line numbers or searching.
The :reg Command
The :reg command in Vim allows you to view and manage the contents of Vim's registers. Registers are temporary storage areas where text is stored when you cut, copy, or paste in Vim. This command helps you access these stored texts, allowing for easy retrieval and reuse.
Viewing Registers
- To view the contents of all registers, type
:regand press Enter. - This will display a list of registers and their contents.
Using Specific Registers
- You can access specific registers by typing
:regfollowed by the register name. For example,:reg ashows the contents of registera.
Types of Registers:
- Unnamed Register (
""): Stores text that was last yanked or deleted. - Named Registers (
a-z): These are registers that you can explicitly specify when yanking or deleting. You can yank or delete to a specific register with"a,"b, etc. - Numbered Registers (
0-9): Automatically store text from the most recent yank or delete operations, with0holding the most recent yank. - Special Registers:
"%: The current file name."#: The name of the alternate file."*and"+: Access to the system clipboard (if supported).
- Macro Registers (
q-z): These registers are used to store macros (sequences of commands). By recording a macro, you can save a sequence of commands to a register and replay them later.
Examples:
- Copying to a Register:
"ayw: Yank a word into registera.
- Pasting from a Register:
"ap: Paste the content of registera.
- Viewing Register Contents:
:reg a: View the contents of registera.
- Saving a Macro to a Register:
- Press
qfollowed by any register letter (e.g.,qa) to start recording a macro into registera - Perform the desired actions.
- Press
qagain to stop recording.
- Press
- Playing a Macro from a Register:
- Press
@ato replay the macro stored in registera.
- Press
The :reg command, along with macro functionality, gives you powerful tools to manage and reuse text and commands in Vim, enhancing your productivity and workflow.